

Your winger beats the full-back, races into space down the side and then… the cross sails over everyone, or arrives at a striker who is standing still on the penalty spot with a defender on each shoulder. Sound familiar? A good crossing and finishing drill fixes both halves of that problem at once, because the cross and the run have to be trained together. A perfect cross with nobody arriving is wasted, and so is a perfect run that meets nothing.
This crossing and finishing drill is built for players aged 11 to 14 who already pass and shoot with some confidence. It focuses on the early, low cross: the ball driven across the front of goal before the defence has recovered. It is a simple, repeatable way to create clear chances, and it has one more advantage for this age group: it keeps the session free of headers. US Soccer guidelines ban heading for players aged 10 and under and limit heading in practice for 11- to 13-year-olds, so a crossing session that lives on the ground is one you can run every week without worrying about it.
You need one goal, a dozen cones and a bag of balls. Sides alternate every rep, a new rep starts about every 15 seconds, and every player is feeding, crossing or making a run in most of them.
Crossing and Finishing Drill: Channel Run and Low Cross
Purpose: Wide players learn to attack a pass into the channel and deliver an early, low cross before the defence can get back. Strikers learn to time near-post and far-post runs so they arrive with the ball, not before it. Alternating sides means players cross with both feet.
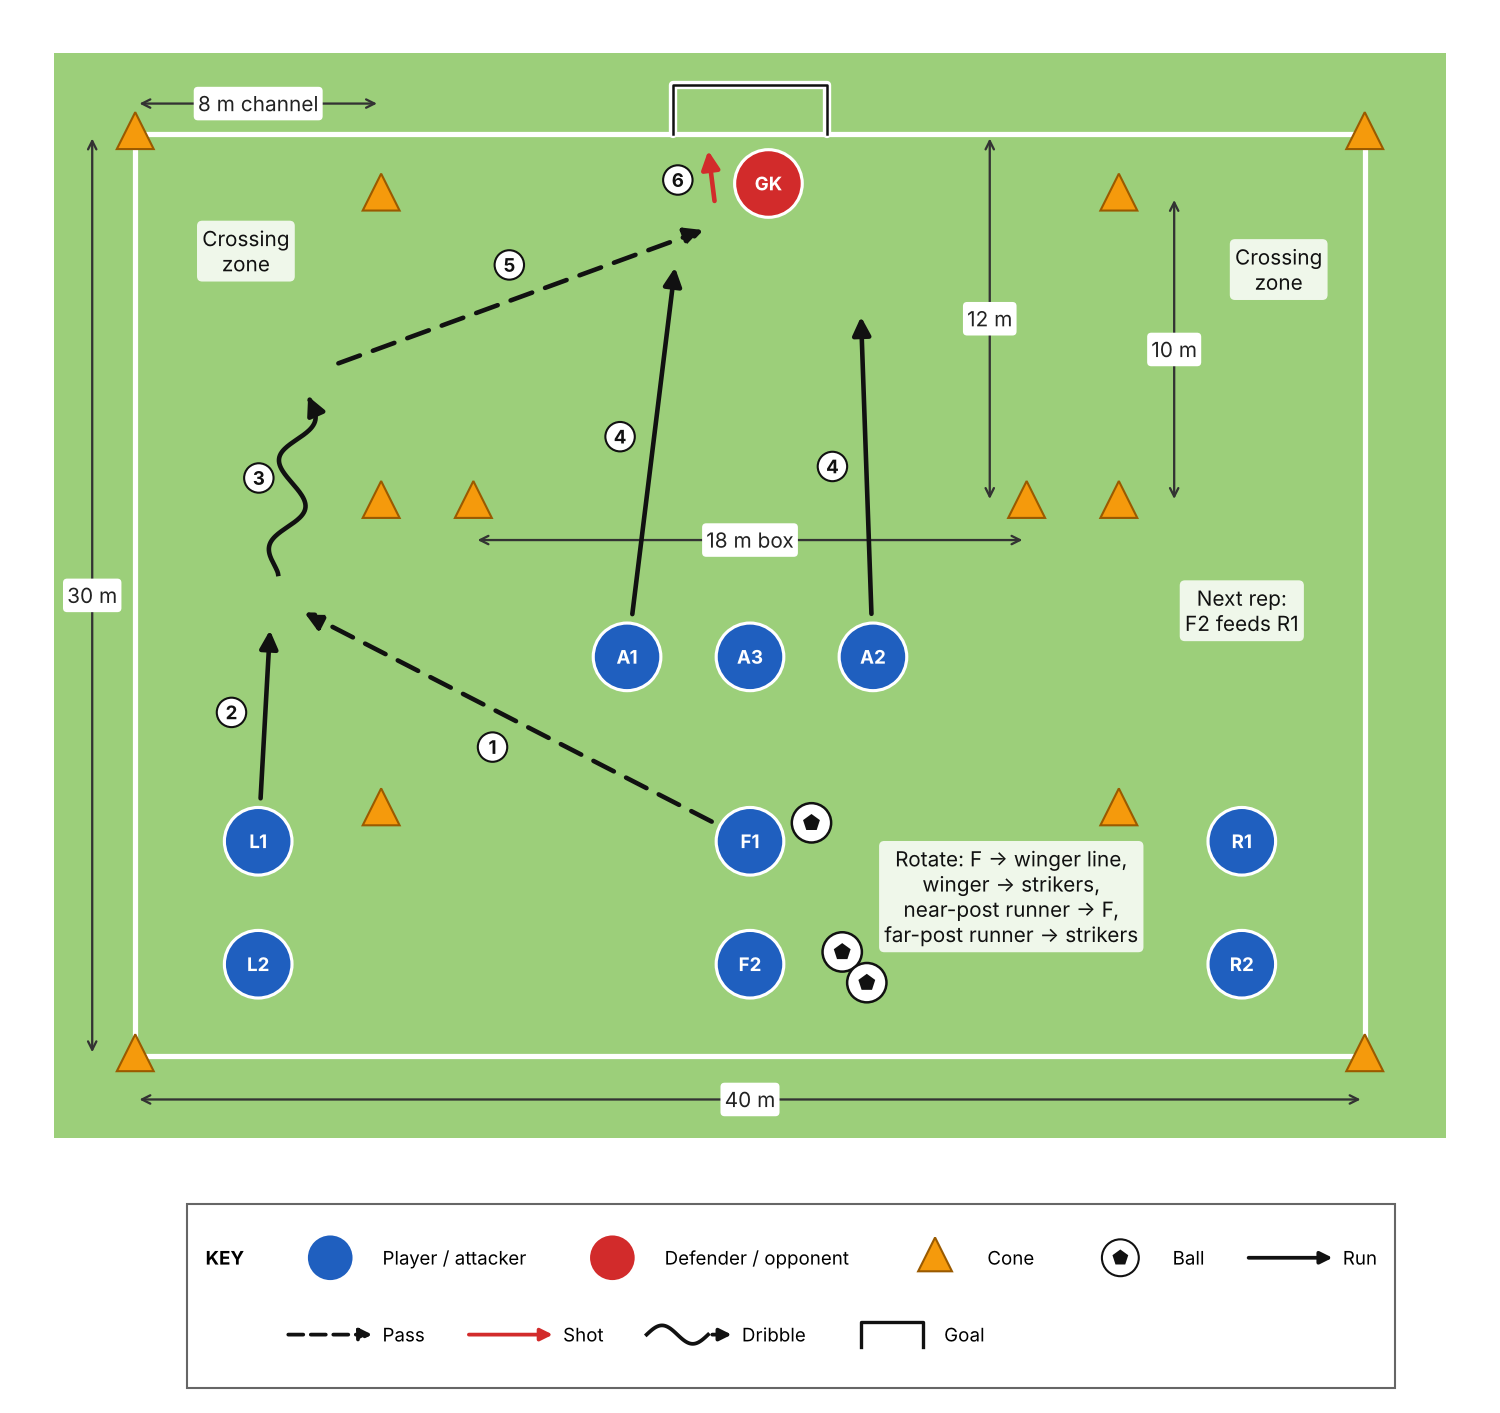
- Age group: 11–14 (U12–U14), intermediate.
- Players: 10 shown: 1 goalkeeper (GK), 2 feeders (F1, F2), 2 left wingers (L1, L2), 2 right wingers (R1, R2) and 3 strikers (A1, A2, A3). With 8 players, use 1 winger per side; the rotation works the same way. With 11–12, add the extras to the striker queue or bring in a second goalkeeper and swap keepers every 3 minutes.
- Duration: 12–15 minutes: 4 rounds of 3 minutes with 30–45 seconds rest between rounds.
- Equipment: 1 youth goal (about 5 m wide, or a full-size goal for U13–U14), 12 cones, 12–15 balls, a bib for the goalkeeper.
- Area: 40 m wide x 30 m long, roughly half of a 9v9 field, with the goal on one end line.
- Skills developed: low driven crossing, attacking a pass into space, timing runs into the box, first-time finishing.
Setup
- Mark a 40 m x 30 m area with a cone on each corner. Place the goal in the middle of one 40 m end line.
- Make two wide channels: a line of 3 cones 8 m in from each touchline, at 8 m, 18 m and 28 m from the start line. Each channel is 8 m wide.
- The crossing zone is the part of each channel between the 18 m cone and the 28 m cone (10 m long). Wingers must cross from inside this zone, before they reach the end line.
- Mark the front of a finishing box with 2 cones, 12 m out from the goal line and 9 m either side of the centre (an 18 m wide box).
- Feeders F1 and F2 queue in the centre, 7 m and 3 m from the start line, with the ball supply next to them.
- Left wingers L1 and L2 queue in the left channel, and right wingers R1 and R2 in the right channel, level with the feeders.
- Strikers A1 and A2 wait 13 m from the start line, 4 m either side of the centre. A3 waits between them as the next striker in.
- The goalkeeper starts in goal.
How to Run the Drill
- F1 starts with the ball and plays a firm ground pass into the left channel, about 8 m ahead of L1 and just short of the crossing zone, so L1 can run onto it.
- L1 sprints forward as soon as F1’s head goes down to pass and meets the ball on the run.
- L1 takes one or two touches forward into the crossing zone, with no more than three touches in total.
- As L1’s first touch goes into the crossing zone, A1 and A2 start their runs. A1 attacks the near post (in front of the left post); A2 attacks the far post and penalty-spot area. Neither runner enters the finishing box before that touch.
- L1 delivers a low, driven cross, along the ground or below knee height, across the front of goal between the goalkeeper and the runners. No lofted crosses.
- A1 or A2 finishes first time. If the goalkeeper collects the cross, they roll the ball behind the goal and the rep ends.
- As soon as the previous runners are out of the finishing box and the crosser has reached the striker queue, F2 (now at the front of the feeder line) plays into the right channel for R1. The same pattern runs on the right side. Sides alternate every rep, so there is a new rep about every 15 seconds.
- Rotation after each rep: the feeder follows their pass to the back of that side’s winger line; the winger sprints to the back of the striker queue; the near-post runner jogs back around the outside of the finishing box to the feeder line; the far-post runner returns to the back of the striker queue. The first player in the striker queue always takes the near post and the second the far post. With 10 players, each outfield player feeds and crosses once every 9 reps (roughly every two minutes) and makes a run about every other rep.
- Scoring (optional, rounds 3 and 4): 1 point per goal, 2 points for a first-time finish. Wingers and strikers score together, so the crosser shares the reward.
- Restart and reset: each new rep starts as soon as the box is clear and two strikers are waiting. Stop and reset if runners are arriving early and standing still in the box, if crosses start floating, or if a line is empty when it is due. Collect the balls between rounds.
Coaching Points
- Feeder: pass into the space ahead of the winger, not to their feet, so they never have to stop.
- Winger’s touch: push the first touch forward and out of your feet, then lift your head to see the runners before you cross.
- Crossing technique: plant the standing foot beside the ball, strike through the middle of the ball with the laces or instep, and keep your chest over it to keep the cross low.
- Target: drive the cross into the corridor between the goalkeeper and the runners, a step in front of the near-post runner, so the keeper can’t claim it and the striker meets it at full speed.
- Runners: go on the winger’s touch into the zone, curve your run so you can see both the ball and the goal, and arrive as the ball arrives.
- Finish: side-on, firm side-foot finish across the goalkeeper. From close range, placement beats power.
Progression
Add one defender in a red bib who starts on the goal line and steps out once the winger enters the crossing zone, either to block the cross or to mark a runner. The far-post runner becomes the defender for 3 reps, then rejoins the striker queue. For a stronger group, also limit wingers to two touches.
Easier Variation
For less experienced players, the feeder passes straight to the winger’s feet, the winger may take up to four touches, the crossing zone extends all the way to the end line, and only one striker makes a run, to the penalty-spot area, then joins the feeder line.
Common Mistakes and How to Fix Them
- Runners arrive too early and wait in the box. Make them hold until the winger’s touch into the zone, and praise goals scored on the move.
- Crosses float up or go behind the runners. Check the standing foot is beside the ball and the chest is over it. Ask wingers to aim one step ahead of the runner.
- The winger takes too many touches and the move stalls. Enforce the three-touch limit and count touches out loud in the first round.
- Both runners attack the same spot. Have the strikers call “near” and “far” before every rep so roles are clear.
Match Connection
Whenever your team gets the ball to a wide player in space, an early low cross before the defence recovers can turn a good run into a clear chance. This drill rehearses the whole sequence: the pass into the channel, the cross, and the two well-timed runs that turn it into a goal.
Crossing and Finishing FAQ
What age should kids start crossing drills?
Players can start practising low crosses and cut-backs as soon as they can strike a moving ball with the inside of the foot or laces, which for many players is around 9 or 10. Lofted crosses that lead to headers are better saved for older players, in line with US Soccer’s heading guidelines.
How do you teach a low cross?
Ask the player to approach at a slight angle, plant the standing foot beside the ball, strike the middle of the ball and keep their chest over it. Leaning back is what makes a cross float.
How many players do you need for a crossing and finishing drill?
This version works best with 8 to 12 players and one goalkeeper. With fewer than 8, keep one winger per side and send a single striker; with more than 12, set up a second goal and run two groups.
Want More Finishing Sessions Like This?
Crossing is only half of the job; the other half is the finish. If your team creates chances but doesn’t convert them, the Chest Dugger Soccer Finishing Book is all about turning chances into goals. For the build-up play that gets your wide players into space in the first place, take a look at the Soccer Offense Book.
Coaching a whole season? The Chest Dugger 6 Book Soccer Coaching Bundle includes Soccer Drills, Soccer Offense, Soccer Intelligence, Soccer Shooting Tips, Soccer Mental Toughness and Soccer Dribbling.
If you play with two wide players, pair this session with our six drills for training a team with two wingers.


